
DB Dressings: Guidelines For Beginners. How To Do DB Dressings In Very Easy Way?
,Hello friends, how are you? I hope you all are well. In today’s post, we are going to discuss how to do DB dressing.
I will tell you everything that is required for DB dressing and how to do it, that too step by step.
What Is DB?
⚡ What is a Distribution Board (DB)?
A Distribution Board (DB) is an electrical panel that distributes electricity from the main power supply to different circuits in a home, office, or building.
It is also called:
- Electrical Panel
- Breaker Panel
- Consumer Unit
🔌 What does a DB do?
A Distribution Board:
- Takes electricity from the main supply.
- Distributes it into multiple circuits (lights, AC, sockets, kitchen, etc.).
- Protects your home from electrical faults using:
- MCB (Miniature Circuit Breaker)
- RCD / RCCB (safety switch)
- MCCB (for large loads)
🧩 Main Parts of a DB
- Main Switch – turns the entire power ON/OFF
- MCB / MCCB – protects each circuit
- RCCB / ELCB – protects from electric shock
- Busbar – distributes power inside the DB
- Neutral & Earth Bar – safety connections
🏠 Where do you find it?
In homes, it is usually near:
- The entrance
- Kitchen or corridor
- Utility area
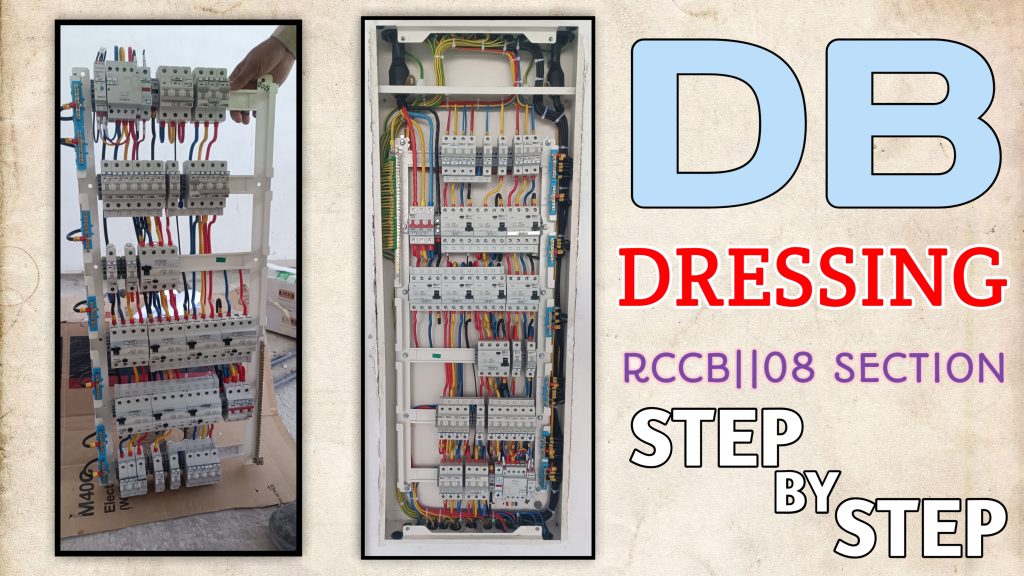
DB DRESSINGS:
Nice — here’s a clear, practical, safety-first guide to doing neat, code-aware DB (distribution board) cable dressing step-by-step. I’ll assume you mean arranging and securing the incoming/outgoing cables inside a distribution board (not medical dressings). ⚡️
Important safety note: working on an electrical distribution board is hazardous. Always isolate the supply and verify it’s dead before touching anything. If you’re not a qualified electrician, strongly consider hiring one. I give best-practice steps and safety checks — not a substitute for certification or local code compliance.
What you’ll need
- Insulated screwdrivers, pliers, wire strippers
- Voltage tester / non-contact detector and digital multimeter
- Insulated gloves and safety goggles
- Cable ties, cable clamps, cable glands, adhesive cable mounts or DIN-rail clips
- Ferrules, heat-shrink, marker labels / cable ID tags
- Measuring tape, cable-tie gun (optional)
- (Optional) cable duct/trunking or prefabricated cable channels
Step-by-step cable-dressing procedure
1) Plan the layout
- Identify incoming (supply) and outgoing (circuits) cables.
- Decide routes for horizontal and vertical runs so conductors follow straight, tidy lines to their terminals.
- Keep high-current power cables separated from control/signal/earth runs when possible.
2) Isolate and verify power is off
- Turn off the main switch / isolator feeding the DB.
- Verify with a voltage tester / multimeter at the incoming terminals and several circuit terminals before touching anything.
- Lock-out/tag-out if required by local practice.
3) Remove cover & take photos
- Remove the DB cover and take a photo for reference before you start. This helps for reassembly and documentation.
4) Prepare cable lengths and routing
- Leave a modest service loop (extra length) so cables aren’t taut — around one coil inside the DB for easy maintenance.
- Cut to length so cables reach terminals without crossing the board. Avoid excessive slack.
- Respect minimum bending radius (typically ≈ 4× cable outer diameter for power cables) — don’t bend sharp kinks.
5) Group and separate circuits
- Group conductors by destination (e.g., lighting, sockets, AC).
- Physically separate neutral and earth bars from live runs where practical.
- Keep multi-core cable pairs together; avoid crossing many conductors over terminal blocks.
6) Fix routing lines / anchoring points
- Use cable glands at board entry points to secure and protect cable sheaths.
- Run main horizontal/vertical runs along the top/bottom or designated cable channels.
- Anchor cables with clamps or adhesive mounts at regular intervals — a common spacing is 150–300 mm for short internal runs; longer unsupported runs need closer spacing.
7) Dress and secure with cable ties (neatness matters!)
- Use cable ties to hold bundles — don’t over-tighten (deforms insulation). Use a cable-tie gun with torque control if available.
- Arrange ties so they are parallel to busbars and away from terminals. Trim tie tails flush.
- For bundles crossing multiple layers, stagger ties so cables sit in a clean ladder pattern.
8) Insulation protection & termination prep
- Fit ferrules on stranded conductors for clean termination.
- Use insulating sleeves or heat-shrink on exposed conductor ends where needed.
- Keep live conductors covered while routing to avoid accidental contact.
9) Label every cable
- Label each incoming/outgoing conductor at the board entry and at the terminal with circuit ID (e.g., “L1—KITCHEN SOCKETS”).
- Use durable markers, printed labels, or shrink-tube labels.
10) Connect to terminals neatly
- Tighten terminals to manufacturer torque specs (over/under torque causes problems). If you don’t have the spec, consult the DB or breaker manual or use a calibrated torque screwdriver.
- Route conductors so they enter the terminal straight (no extra bending at the clamp).
11) Segregation & safety components
- Keep earth and neutral bars clear and accessible.
- Ensure RCDs/MCBs are mounted with enough clearance for heat dissipation and future cable access.
- Fit insulating barriers if the DB design requires it.
12) Check, test & tidy
- Re-check terminal tightness and labels.
- Perform insulation resistance test or continuity tests as appropriate (and per local wiring regs).
- Test RCD/trip function after re-energizing.
- Replace DB cover securely.
13) Re-energize and final test
- Remove tools, ensure no foreign objects inside DB.
- Restore supply and test each circuit (lights, sockets, RCDs).
- Record the changes and keep your photos + labeling for future maintenance.
Good practices & tips
- Keep routing symmetrical — it looks professional and makes troubleshooting easier.
- Use cable ducts or trunking inside large DBs for extra neatness.
- Avoid running conductors across front of breakers where they would be pinched by the cover.
- Use color coding consistent with your country’s wiring standard.
- When in doubt about torque values, insulation testing, or if live work is needed — call a licensed electrician.
Quick checklist (before touching anything)
- Main isolator OFF.
- Verify no voltage with a tester.
- Insulated tools and PPE on.
- Photo of original layout taken.
- Labels, ties, clamps ready.
If you’d like, I can:
- give a short shopping list of commonly used components for DB dressing in your country, or
- draw a simple labeled diagram showing typical cable routes inside a DB, or
- provide a checklist you can print and follow on the job.
Which would help you most? 😊

- Google Play Redeem Code Free: Daily Giveaway on WWW.LIVESM.IN - April 4, 2026
- 15+Dj Remix Background Poster |Ultra 4K Background Poster Part 02 - March 29, 2026
- TOP 20+ Unlimited DJ Remixer Background Posters | Free 4K Download - March 28, 2026
Can you be more specific about the content of your article? After reading it, I still have some doubts. Hope you can help me.
Your article helped me a lot, is there any more related content? Thanks! https://accounts.binance.info/sl/register-person?ref=I3OM7SCZ